Sunday 26 October 2014

Birthday Wishes...

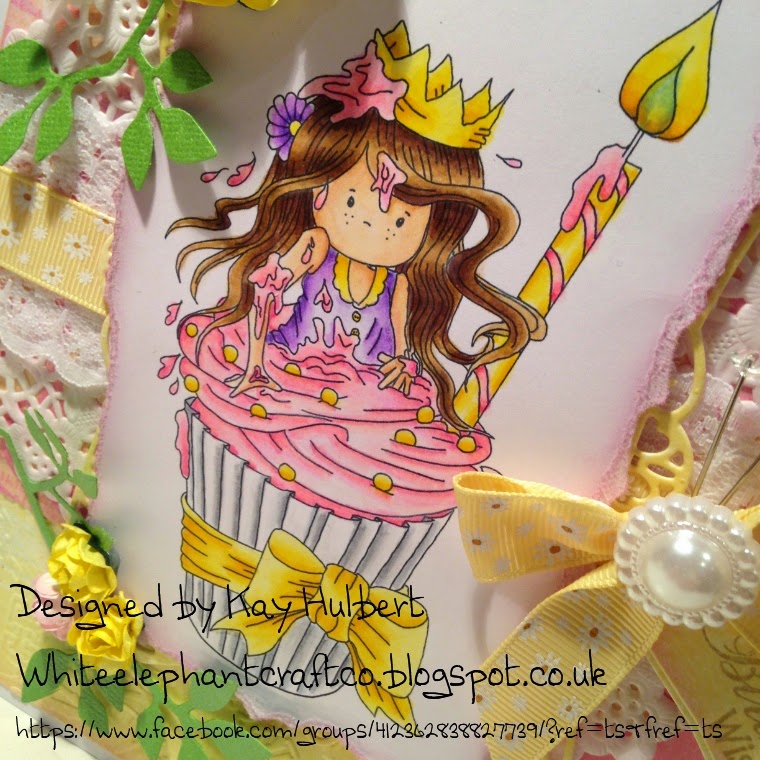
This week I thought I'd practice my colouring on a lovely Polkadoodles digi image from http://www.polkadoodles.co.uk

As they are doing birthdays this week the image was perfect!  It has sat on my desk all week and I finally got to make it into something today.  I've entered it into their most recent challenge here


My colouring is still a learning process, but the more I practice the better I will get!  The image is coloured using Spectrum Noir pens and pencils.


The paper is by Papermania purchased from Carshalton Craft.
The Vintage embossing folder is Crafters Companion.
The ribbon, doilies, and roses are from Hobbycraft.
The lace and bow topper are from China via ebay!
The small pearls and hat pins are from my stash.
The leaves are cut from a Tim Holtz strip die Spring Greenery.
The Tag and background die are spellbinders Framed Tags One and Timeless rectangles.
Happy Birthday stamp was free in a magazine years ago and it was stamped with a gold ink pad and edged with a pale pink ink pad.


I will add the list of Spectrum Noir pens and pencils used tomorrow!

Till next time...
Kay
x


Sunday 19 October 2014

Two very different leaving cards...

 I was asked to make a couple of cards for people leaving work.  They are both A4 and I use Anita's A4 card packs and it was all mounted on Mirri card.
The first is a stamp used called New Heights which is apt for the type of card.  I used A4 gorjuss girl paper and ribbon.  The Good Luck stamp is from Sheena Douglas Mystery sets and I used pearls from my stash.  The butterfly stamp is also from the New Heights stamp set.

The gorjuss girl was coloured with Spectrum Noir pens and pencils and cut by hand.

The second card I also coloured and is a maternity leaving card.

I used an image that I know I purchased and I'd love to share where from but I cannot remember and despite spending 20 mins on google and pininterest I still have no idea!  If anyone knows please let me know! It is signed!
The word stamp was a free indigo blue stamp free in a magazine.

The pink and green papers are American Crafts 12x12 papers which have been embossed and the bird paper is Stampin Up. The main image and word stamp were cut with spellbinder dies.

The ribbon, twine and green button are from Hobbycraft and the flowers are Petaloo Love. The metal pearls are from my local craft shop. Again the digi stamp was coloured using Spectrum Noir pens and pencils.


Next week I would have been at the beginning of September for my makes as I am trying to catch up in order, but I've finally been making Christmas cards so will share those instead! 

Kay


x

Monday 6 October 2014

Dad's 80th Birthday...

A Special Birthday

As promised here are the projects I made for my dad's birthday in August.


I used a Hunkydory topper and card with a spellbinders die and kept everything gold!  I cut the largest die from the Timeless rectangle three times, in black, gold and craft card.  As the middle was covered by the topper I cut them in half so I could mat and layer them as it is the largest die I have in this style and shape.  I stamped the Anna Griffen happy birthday stamp onto Polkadoodles card which is the best for colouring really but it was a bit that was a leftover! This was mounted with another die from the same set Blossom tags and accents that I used on the stamped image.

The 80 is cut from Tim Holtz alphabet die and the tag is cut from some dies that were free in a magazine!  The gold ribbon and dots are from my mountain er stash of craft stuff!

This is what 'we' made for Grandad!

The cars pull along so it was a fun card for the kids to help make.
It is using Hunkydory die cut decoupage toppers and a couple of pennies to make the pulling bit a little more sturdy!  The bow is just from the Lattice bow set by Sue Wilson and the button from my jar!
The background paper is create and craft dainty dots in the red and the blue is the sparkly paper they did at the same time but I cannot remember what it is called!  Anyway it was embossed with a Crafters Companion Vintage embossing folder which I wanted for so long!

This is another card I made for my father in law to give to him as every birthday my father in laws gift from me is the years worth of cards he needs!

I used the Sheena Douglas stamps from the little bit sketchy range - Visitor.  The birthday stamp and banner were free with a magazine!  It was all done with gold fine detail embossing powder on water colour card.

The Album
I also had a task and a half, I decided that all his photo's shouldn't be in a box any longer.  I went the project life route as I had so many pictures to fit in.  The cards are all left blank as I wanted my dad to write on them.


I only took a couple of pictures as they are his private pictures.  It was a challenge as I ended up in tears every time I did a bit to it!  From his tough childhood to all the family that are no longer with us it was very emotional but well worth it as he loves it and keeps looking at it.  My cousin now wants to make one the same!  He is not crafty in any way but I think with Project Life it's so simple he will be fine!

I also found out my son is the spit of my dad...


My son aged 4 and my great grandmother and my dad aged around 4.

Till next week.

Kay
xxx

Sunday 28 September 2014

Oh dear..


The last time I was on here was a while ago!  Well with my dad's 80th, our 1st holiday in 9 years and the little one starting school it's been a lovely and hectic summer!
Now I will have a bit more time with the monster at school Friday is going to be my blog/craft day!  As the PC was broken it will just have to be a few days late this week!

I will start from where I left off! The last project the Alice In Wonderland book was quite a task so it was nice to get back to something smaller and quicker!

These are the thank you cards and gift bags I made for the kids teachers at the end of term in July.

This was from my son to his pre-school teacher. She is lovely so I spent a bit more time on these!  I found the image of the boy on Google images which was coloured with Spectrum Noir pens and pencils.  The blue paper is dainty dots from Create & Craft, the banner is made with a stampin up punch and stamps and everything else is cut out with spellbinder dies.  The ribbon was just from my stash!

The bag papers are Craftwork Cards and the bows are Just Rite dies.  Again everything else is cut with Spellbinders.  The pearl domes are from China, ebay is becoming my friend now I buy in bigger quantaties!


These were for my daughter's PE teacher who she really liked and who was leaving.  He loves rugby so I used Papermania male sports 12 x 12 papers and Tim Holtz rosette dies and that was about it other than a bit of mirri card!  The gift bags are from Create and Craft.


These two were for my daughters teacher and assistant teacher. They were made again with just spellbinder dies, some scrap papers and some ribbon from my stash!  The boarder punch is by Martha Stewart and I used the stampin up punch and stamps again.  The teacher stamp is just a single one in my stash, possibly from a magazine!

Well that takes me up to the end of July!  August birthday's and an emotional photo album next week!

Kay
x

Sunday 8 June 2014

Alice In Wonderland...

This is a project I've been working on for months on and off.  I had to order lots of bits and pieces and do a huge amount of painting and colouring so that is why it has been in the planning for a while!  If anyone wants to know where any of it came from please comment on the post!

It was made for a special friend who loves Disney and as she had a Mad Hatters Tea Party for her 18th thought this was quite apt for a 21st pressie!

I started off with a Tim Holtz Idea-ology book...


and ended up with this...


I found an Alice book falling apart at a May Day Fete and as it was so tatty and only 50p I didn't feel so bad ripping it up!

Sneak peak of inside...

The distressed paint was really easy to do thanks to a tip by Ali Reeve.  I painted the whole thing with red acrylic paint then with a scourer dragged some black acrylic paint over the top. It was so quick and easy!  I was going to cover so you would have only seen the edges but it turned out so good I wanted it to be seen.

The Inside...


 A necklace that can be removed.


A keyring that can be removed


The mad hatter and cheshire cat were my favorites to colour!


And yes, she did cry when she opened this.  Made all the hours worth while!

Happy 21st Birthday Chloe

Kay
x

Special Birthdays....

A 21st birthday of a very special friend...

These Scruffy Cat stamps were a recent purchase and now I have 2 I need the rest!

This is the first one I played with and it is coloured using Spectrum Nior pens and then Spectrum Noir pencils.


The flowers, leaves, Happy Birthday and 21 were all from my stash.  The background paper is from the Scruffy Cat CD by Crafters Companion from Create & Craft TV. The ribbon was from QVC years ago the doilies are from Hobbycraft.  The Wish Big stamp is by Stampin Up as is the Pixie Pink ink pad used to edge the whole thing and the tag is from Framed Tags One Spellbinders set. The middle punched band is Martha Stewart as is the eyelash glitter. The pink embossing behind the main image is a Tim Holz Paris folder and the white embossing folder I am unsure of as borrowed from my mum ages ago and I just embossed lots! 


The pearls and gems are do crafts and the big pearl is from Ebay.  The pink leopard print Candi is by Craftwork Cards and lastly the spellbinders die used to cut the character out is the largest from Timeless rectangles.


I love this image and have done a few other colours....images coming soon!

Kay
x

Tuesday 29 April 2014

Going digital...

My first play with Seriff Craft Artist 2!


I've been busy but managed to design these in between doing other things but I need to sit and watch some demo's to see what it can really do!

Thought I'd try Scrapbooking as well just to see what I thought of it...Looks great, but would like to print it out separately and make it up like a normal page!  Traditional scrapbooking is still my preferred way although it's definitely not as quick!  But as the design of the page is usually what takes the time I have already planned it here ready for when I want (well get time really!) to scrapbook.  For anyone who is stuck on time but wants to sort out their photo's it's great and realistically I did only spend a total of about an hour making all these in total so it's easy to use.

I have a few people who want to sell my cards but I have not had the time to sit and hand make them.  This software means I can!  

Kay
xxx